This guide also applies to web frameworks that run on Cloudflare Workers. For example, you can use the same OpenTelemetry configuration described below for Hono apps deployed to Cloudflare Workers.
Prerequisites
- Create an Axiom account.
- Create a dataset in Axiom where you send your data.
- Create an API token in Axiom with permissions to ingest data to the dataset you have created.
- Create a Cloudflare account.
- Install Wrangler, the CLI tool for Cloudflare.
Setting up your Cloudflare Workers environment
Create a new directory for your project and navigate into it:Cloudflare Workers Script Configuration (index.ts)
Configure and implement your Workers script by integrating OpenTelemetry with the@microlabs/otel-cf-workers package to send telemetry data to Axiom, as illustrated in the example index.ts below:
Replace
AXIOM_DOMAIN with the base domain of your edge deployment. For more information, see Edge deployments.Wrangler Configuration (wrangler.toml)
Configure wrangler.toml with your Cloudflare account details and set environment variables for the Axiom API token and dataset.
Replace
API_TOKEN with the Axiom API token you have generated. For added security, store the API token in an environment variable.Replace DATASET_NAME with the name of the Axiom dataset where you send your data.Install Dependencies
Navigate to the root directory of your project and add@microlabs/otel-cf-workers and other OTel packages to the package.json file.
npm install to install the packages. This command will install all the necessary packages listed in your package.json file.
Running the instrumented app
To run your Cloudflare Workers app with OpenTelemetry instrumentation, ensure your API token and dataset are correctly set in yourwrangler.toml file. As outlined in our package.json file, you have two primary scripts to manage your app’s lifecycle.
In development mode
For local development and testing, you can start a local development server by running:wrangler dev allowing you to preview and test your app locally.
Deploying to production
Deploy your app to the Cloudflare Workers environment by running:wrangler publish, deploying your project to Cloudflare Workers.
Alternative: Use Wrangler directly
If you prefer not to usenpm commands or want more direct control over the deployment process, you can use Wrangler commands directly in your terminal.
For local development:
View your app in Cloudflare Workers
Once you’ve deployed your app using Wrangler, view and manage it through the Cloudflare dashboard. To see your Cloudflare Workers app, follow these steps:- In your Cloudflare dashboard, click Workers & Pages to access the Workers section. You see a list of your deployed apps.
-
Locate your app by its name. For this tutorial, look for
my-axiom-worker.
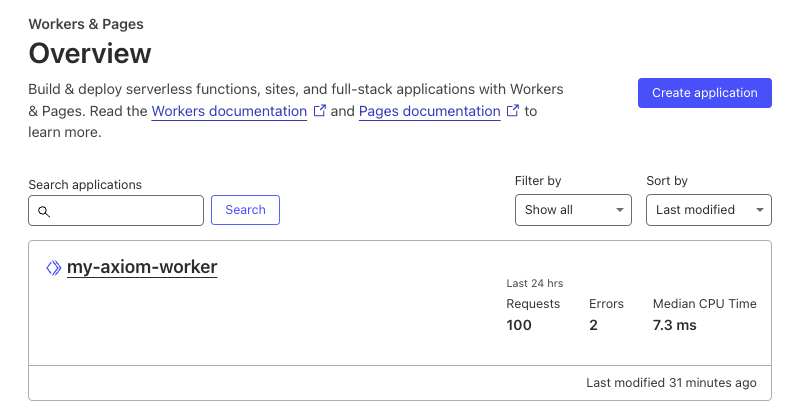
- Click your app’s name to view its details. Within the app’s page, select the triggers tab to review the triggers associated with your app.
- Under the routes section of the triggers tab, you will find the URL route assigned to your Worker. This is where your Cloudflare Worker responds to incoming requests. Vist the Cloudflare Workers documentation to learn how to configure routes
Observe the telemetry data in Axiom
As you interact with your app, traces will be collected and exported to Axiom, allowing you to monitor, analyze, and gain insights into your app’s performance and behavior.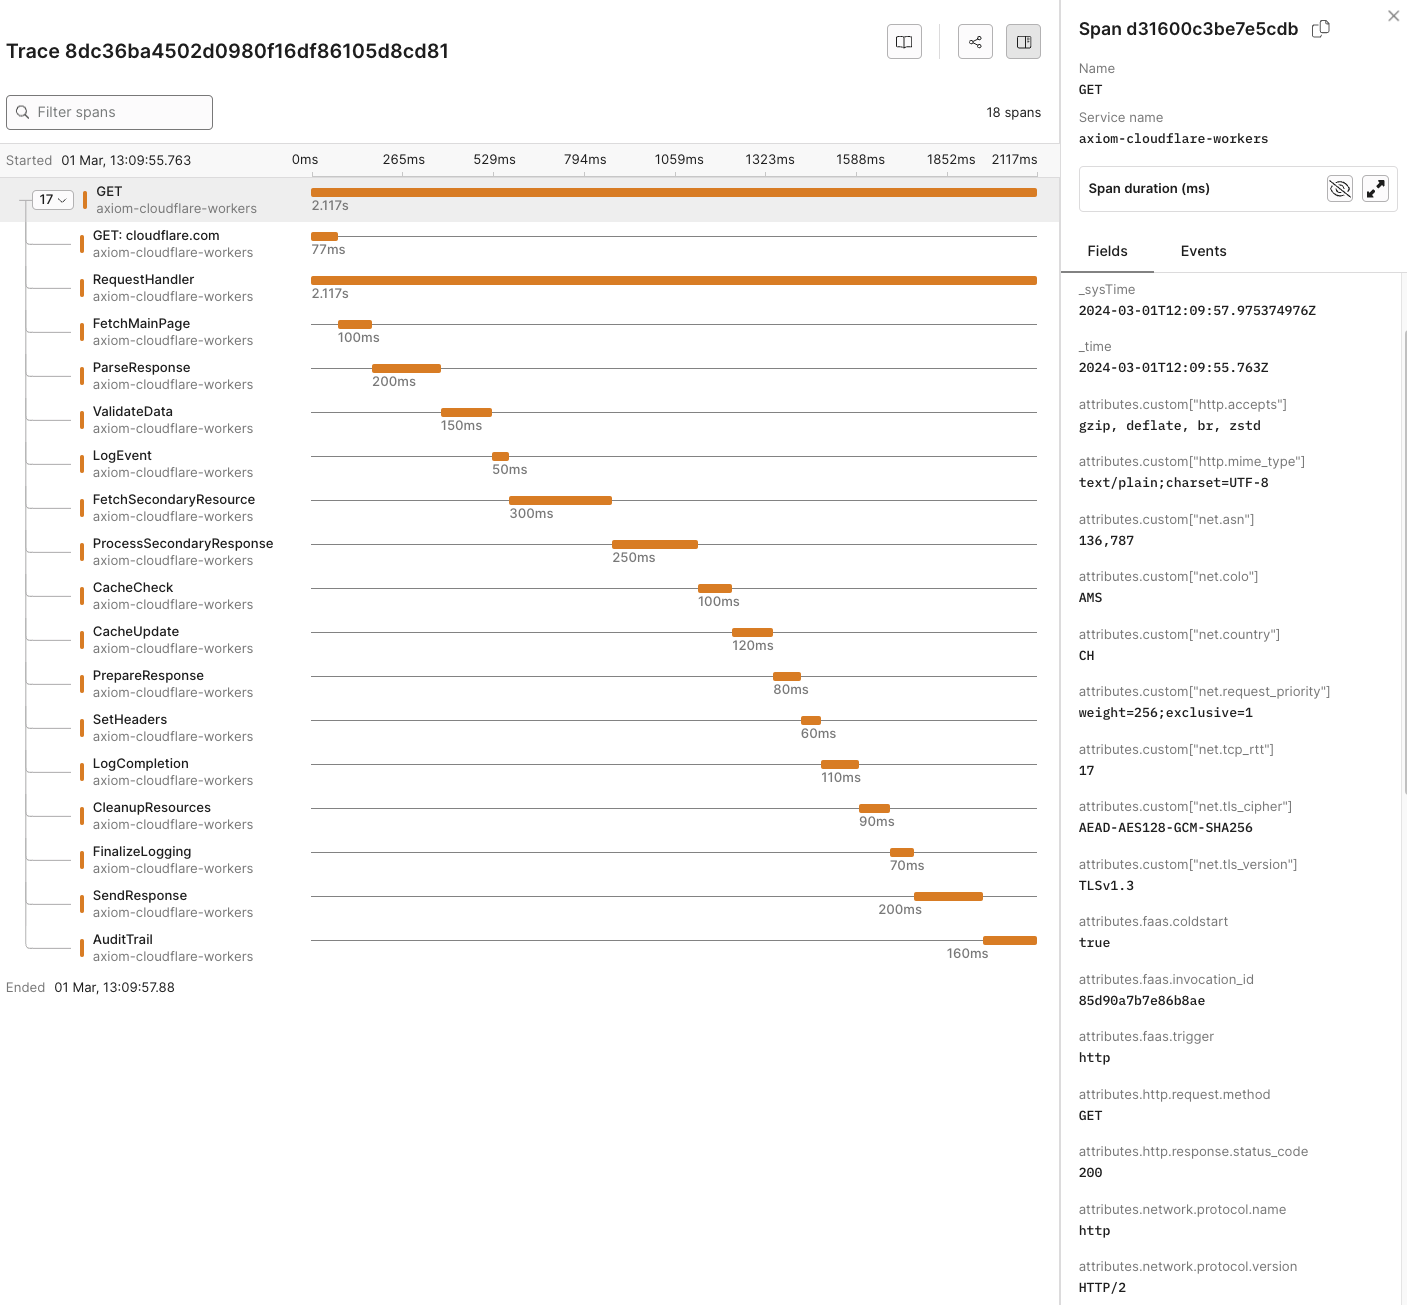
Dynamic OpenTelemetry traces dashboard
This data can then be further viewed and analyzed in Axiom’s dashboard, offering a deeper understanding of your app’s performance and behavior.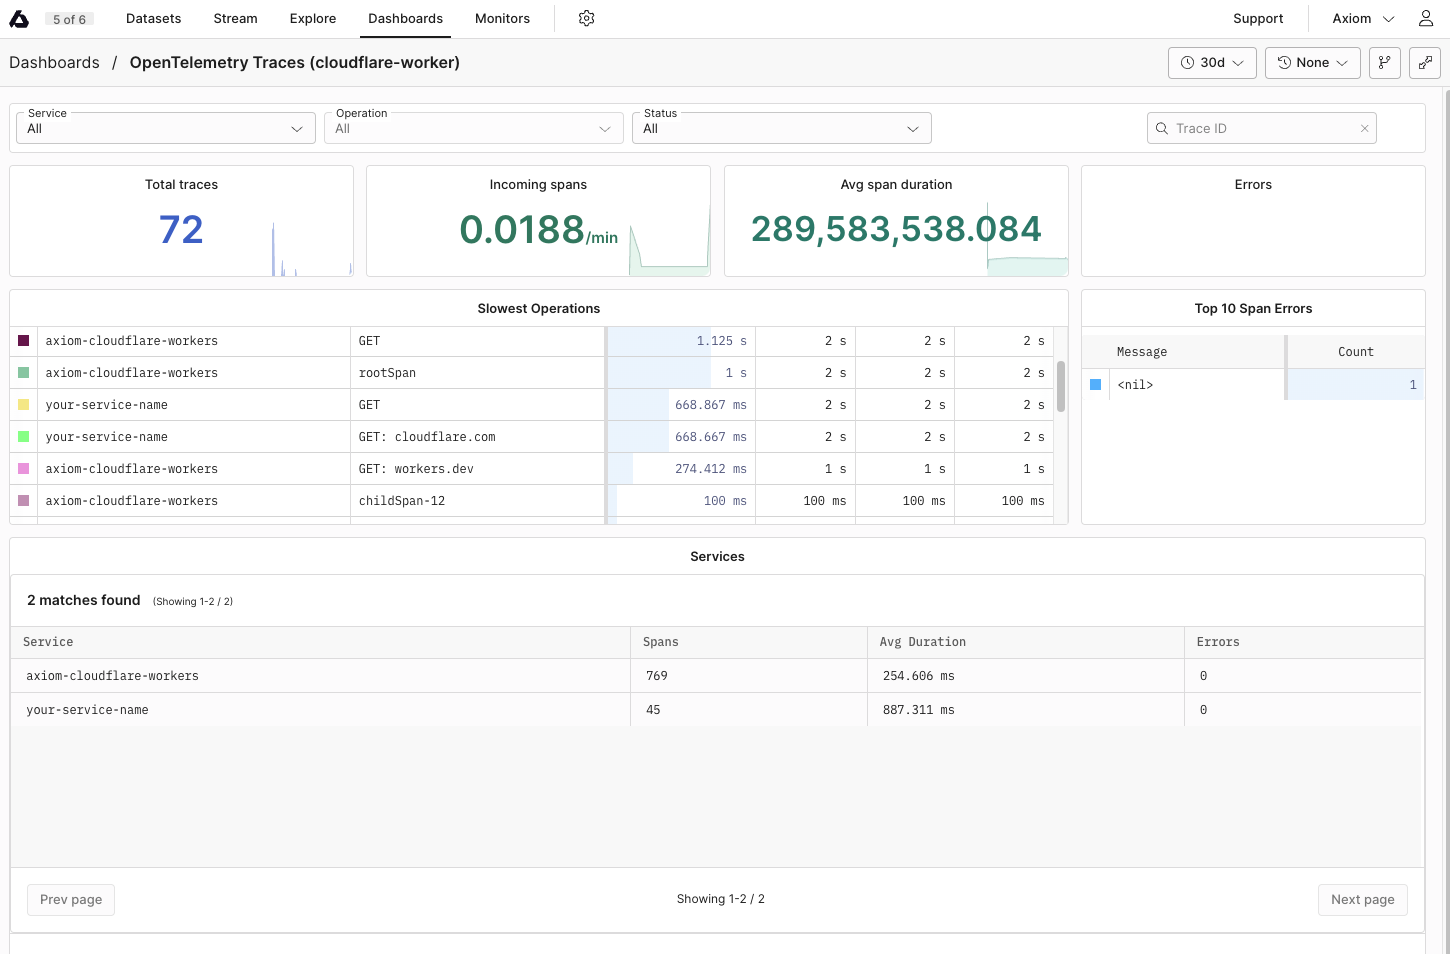
wrangler.toml. This simplifies setup through the Cloudflare dashboard web interface.
Manual Instrumentation
Manual instrumentation requires adding code into your Worker’s script to create and manage spans around the code blocks you want to trace.- Initialize Tracer:
@microlabs/otel-cf-workers package.
- Create start and end Spans:
- Annotate Spans:
Automatic Instrumentation
Automatic instrumentation uses the@microlabs/otel-cf-workers package to automatically trace incoming requests and outbound fetch calls without manual span management.
- Instrument your Worker:
instrument function from the @microlabs/otel-cf-workers package. This automatically instruments incoming requests and outbound fetch calls.
-
Configuration: Provide configuration details, including how to export telemetry data and service metadata to Axiom as part of the
instrumentfunction call.ReplaceAXIOM_DOMAINwith the base domain of your edge deployment. For more information, see Edge deployments.
@microlabs/otel-cf-workers package takes care of tracing automatically.
Reference
List of OpenTelemetry trace fields
| Field Category | Field Name | Description |
|---|---|---|
| Unique Identifiers | ||
| _rowid | Unique identifier for each row in the trace data. | |
| span_id | Unique identifier for the span within the trace. | |
| trace_id | Unique identifier for the entire trace. | |
| Timestamps | ||
| _systime | System timestamp when the trace data was recorded. | |
| _time | Timestamp when the actual event being traced occurred. | |
| HTTP Attributes | ||
| attributes.custom[“http.host”] | Host information where the HTTP request was sent. | |
| attributes.custom[“http.server_name”] | Server name for the HTTP request. | |
| attributes.http.flavor | HTTP protocol version used. | |
| attributes.http.method | HTTP method used for the request. | |
| attributes.http.route | Route accessed during the HTTP request. | |
| attributes.http.scheme | Protocol scheme (HTTP/HTTPS). | |
| attributes.http.status_code | HTTP response status code. | |
| attributes.http.target | Specific target of the HTTP request. | |
| attributes.http.user_agent | User agent string of the client. | |
| attributes.custom.user_agent.original | Original user agent string, providing client software and OS. | |
| attributes.custom[“http.accepts”] | Accepted content types for the HTTP request. | |
| attributes.custom[“http.mime_type”] | MIME type of the HTTP response. | |
| attributes.custom.http.wrote_bytes | Number of bytes written in the HTTP response. | |
| attributes.http.request.method | HTTP request method used. | |
| attributes.http.response.status_code | HTTP status code returned in response. | |
| Network Attributes | ||
| attributes.net.host.port | Port number on the host receiving the request. | |
| attributes.net.peer.port | Port number on the peer (client) side. | |
| attributes.custom[“net.peer.ip”] | IP address of the peer in the network interaction. | |
| attributes.net.sock.peer.addr | Socket peer address, indicating the IP version used. | |
| attributes.net.sock.peer.port | Socket peer port number. | |
| attributes.custom.net.protocol.version | Protocol version used in the network interaction. | |
| attributes.network.protocol.name | Name of the network protocol used. | |
| attributes.network.protocol.version | Version of the network protocol used. | |
| attributes.server.address | Address of the server handling the request. | |
| attributes.url.full | Full URL accessed in the request. | |
| attributes.url.path | Path component of the URL accessed. | |
| attributes.url.query | Query component of the URL accessed. | |
| attributes.url.scheme | Scheme component of the URL accessed. | |
| Operational Details | ||
| duration | Time taken for the operation. | |
| kind | Type of span (for example,, server, client). | |
| name | Name of the span. | |
| scope | Instrumentation scope. | |
| scope.name | Name of the scope for the operation. | |
| service.name | Name of the service generating the trace. | |
| service.version | Version of the service generating the trace. | |
| Resource Attributes | ||
| resource.environment | Environment where the trace was captured, for example,, production. | |
| resource.cloud.platform | Platform of the cloud provider, for example,, cloudflare.workers. | |
| resource.cloud.provider | Name of the cloud provider, for example,, cloudflare. | |
| resource.cloud.region | Cloud region where the service is located, for example,, earth. | |
| resource.faas.max_memory | Maximum memory allocated for the function as a service (FaaS). | |
| Telemetry SDK Attributes | ||
| telemetry.sdk.language | Language of the telemetry SDK, for example,, js. | |
| telemetry.sdk.name | Name of the telemetry SDK, for example,, @microlabs/otel-workers-sdk. | |
| telemetry.sdk.version | Version of the telemetry SDK. | |
| Custom Attributes | ||
| attributes.custom.greeting | Custom greeting message, for example,, “Welcome to Axiom Cloudflare instrumentation.” | |
| attributes.custom[“http.accepts”] | Specifies acceptable response formats for HTTP request. | |
| attributes.custom[“net.asn”] | Autonomous System Number representing the hosting entity. | |
| attributes.custom[“net.colo”] | Colocation center where the request was processed. | |
| attributes.custom[“net.country”] | Country where the request was processed. | |
| attributes.custom[“net.request_priority”] | Priority of the request processing. | |
| attributes.custom[“net.tcp_rtt”] | Round Trip Time of the TCP connection. | |
| attributes.custom[“net.tls_cipher”] | TLS cipher suite used for the connection. | |
| attributes.custom[“net.tls_version”] | Version of the TLS protocol used for the connection. | |
| attributes.faas.coldstart | Indicates if the function execution was a cold start. | |
| attributes.faas.invocation_id | Unique identifier for the function invocation. | |
| attributes.faas.trigger | Trigger that initiated the function execution. |
List of imported libraries
@microlabs/otel-cf-workers
This package is designed for integrating OpenTelemetry within Cloudflare Workers. It provides automatic instrumentation capabilities, making it easier to collect telemetry data from your Workers apps without extensive manual instrumentation. This package simplifies tracing HTTP requests and other asynchronous operations within Workers.
@opentelemetry/api
The core API for OpenTelemetry in JavaScript, providing the necessary interfaces and utilities for tracing, metrics, and context propagation. In the context of Cloudflare Workers, it allows developers to manually instrument custom spans, manipulate context, and access the active span if needed.
@opentelemetry/exporter-trace-otlp-http
This exporter enables your Cloudflare Workers app to send trace data over HTTP to any backend that supports the OTLP (OpenTelemetry Protocol), such as Axiom. Using OTLP ensures compatibility with a wide range of observability tools and standardizes the data export process.
@opentelemetry/otlp-exporter-base, @opentelemetry/otlp-transformer
These packages provide the foundational elements for OTLP exporters, including the transformation of telemetry data into the OTLP format and base classes for implementing OTLP exporters. They are important for ensuring that the data exported from Cloudflare Workers adheres to the OTLP specification.
@opentelemetry/resources
Defines the Resource, which represents the entity producing telemetry. In Cloudflare Workers, Resources can be used to describe the worker (for example,, service name, version) and are attached to all exported telemetry, aiding in identifying data in backend systems.